How to recycle an old door – Part 2

Heres the second part of how to build a door desk! Now that it’s done, I am more than excited about it and it looks super great! Also, I now have double the work space before which is perfect! So here is how I finished her up…

The door was super dirty by the time i got back to the project, my brother decided it would be a great place to store all of his power tools. Typical. Let lets just say it took a lot longer than i thought to clean this sucker up! Heres the handy dandy supplies needed:

– paint pan

– large paint roller

– smaller sponge roller (not required but came in handy)

-small paintbrush

– Primer. I used Behr Enamel Undercoater Primer & Sealer.

– Paint: I used a white satin acrylic based paint

-Sand paper blocks

Sanding

Maybe one of the most important steps! Before you ever even think about painting; sand, sand, sand! In the picture above you can see there was some filler that needed to be sanded off as well.  This helps smooth out surfaces as well as prepare the surfaces to really hold on to the primer and paint. I also sanded in between the two layers of paint to smooth out any drips.

Primer

Primer is not always necessary but it helps cut down the number of paint layers and really makes the paint stick. Its great on slick surfaces even laminate and really holds the paint. Its also less expensive than paint so one layer of primer might save you from one or two additional layers of paint!

Primer was necessary for my table because i used nothing but scraps – as you can tell there are at least three different types of wood in very different shades; one white(ish) door, red oak and plywood. The primer (top right) really levels out the colors and makes the paint smooth and even.

Paint

I have a small obsession with thick paint. All of my paintings have dozens of thick layers and textures of paint so when painting furniture i tend to go too thick. This time around i made sure to do thin, even layers and it really came out beautifully. All it needed was one layer of primer and two thin layers of paint. So my final desk is perfect! It has plenty of table space, clean, modern design, room for storage (i have a thing for boxes and baskets… so much better than boring drawers!) and best of all, it was free!

So heres my new office – its definitely a place where I sit down and automatically feel comfortable, stress free and ready to be creative. I love it!

Have you guys been building anything lately? Refurbish one man’s junk to make something rad? Speaking of, i have some oh so lovely goodwill finds to share soon! Woot!

-Rachel

Before & After: Door to Desk

Alrighty… its *FINALLY* done! Not that it took long to make, it just took forever to get the time to finish painting! But here we go… the “before” of Mr. Door:

And here is the oh so beautiful after:

Isn’t that just refreshing? And incase you forgot what the space looked like before… yikes! Heres a little reminder:

Eww… i know. Sorry to post such a disaster but it makes the After shot much sweeter…

In this last shot you can see the door knob hole where i run the cables through. I initially thought I’d put the desk against the wall so i didn’t expect to need to fill the latch hole but I’m definitely going to have to do a quick fix!

I will post soon my how-to on the paint! If you want to read about the building process go here, here and here!

Also,  (drum roll please) the main reason why I’ve been so determined to get my office up and running: starting friday at 6pm I am officially a full time freelance artist! I semi blame this book for gettin the fire started… read it at your own risk…  four months later you might end up quitting your job too!

-Rach

How to recycle an old door

Have any old doors lying around? For some reason people have been throwing them at me lately (not literally) but Kennys folks had about three, my brother had 2 and some coworkers even tried to give me some old doors. I suppose one is enough for now! Ana White has multiple projects that include using hollow core doors so i thought i’d try it! And from a recent post here you know that I’ve been on the search for a new computer desk. So i decided to recycle this old yucky door into a new pretty desk!

First step was to cut that sucker down.  A full length door would be better used for a dining table (which I’ve seen done!) But considering i have no need currently for a dining table… here we go. The trick with this is to score the wood first so it doesn’t fray. A circular saw is definitely the way to go. If you don’t have any tools, you can always borrow them from a neighbor or you can just rent them from home improvement stores. Since cutting the door in half weakens the door on the cut side, your best bet is to find a piece of wood to fit and clue and nail her in there. I plan on putting this desk through a lot so the best bet it to make her a sturdy and stable as possible.

Step two: find a piece of scrap wood to fit and glue. Step three: wedge the glue covered wood into the space. And last, staple gun that sucker in there just incase!

Then I used Patch n paint spackling to fill the small holes and then a more heavy duty hole filler for the hinges. I decided to leave the hole for the door knob and use it to hide all of my computer cables.

The next step: legs! Incase you don’t remember, here is the basic table idea that i was trying to duplicate:

This design is from West Elm and you can take a look here. Mine is a lot wider and deeper so I had to make adjustments to the depth and width of the legs so they fit to the door. Instead of an in depth step by step, heres the overview:


Heres the skinny:

A. Select wood – since I was workin at Mr. H’s shop, he had tons of scraps which made this entire project Free!

B. Slightly panic as Mr. H shows me how to use a table saw. *Let me explain. I’m down with power tools. They pretty much excite me. But that thing is just scary… especially for someone clumsy like me! Two power tools i will (hopefully) never use: Table saw & chain saw.

C. View of Mr. H severing a limb cutting the wood

D&E. Sanding all the sharp edges

F&G: Let me introduce you to the BRILLIANT invention of Biscuits!

H: We used a biscuit joint cutter to cut slits in all the wood. Instead of using expensive screws or a Kreg Jig that takes ages to predrill all the holes, you easily cut slits in the wood then a biscuit and some glue. It makes incredibly strong joints and saves cash in the long run.

i: After the biscuits were glued and inserted in the joints, the wood was completely solid.

j: Here i measured furring strips to make cleaner edges and cover the plywood edges

k: I may have gone clamp crazy. since using nothing but glue, you gotta make sure theres no gaps!

l: Next i nailed the furring strips in place (this actually came before K but who is judging?!)

m: used more of the spackling for filler on the edges.

Next steps: sanding the filler, painting and putting the whole thing together! *Hopefully* soon!

-Rachel

Sew Rad

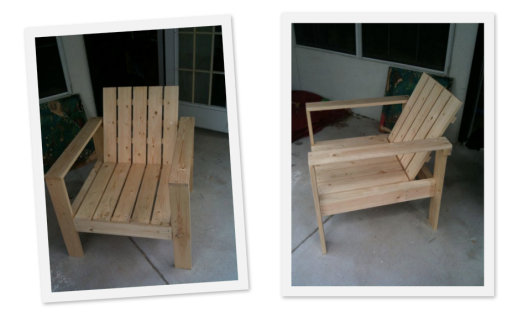
Man, i am beyond cheesey these days. Deal with it. Ok so i realized the other day that i never posted about a small little project i did a while back…. my outdoor sectional! Crazy! This was my first furniture build and my first time to sew anything! SO here we go… If you dont already know and love Mrs. Ana White, you definitely need to meet her (and then “accidently” spend 3 hours searching through her site for furniture you  HAVE to build).

Now, I’m a huge outdoor person… always have been. And my last apartment (which i miss dearly now that i live in this yucky boys house) had an AMAZING porch – pretty large AND it overlooked the lake! Seriously breath taking every morning… the issue is… I’d just ahve to stand there. Because again, I’m a recent graduate where the only furniture you have is bean bags and crappy dorm room stuff. Anyway, so i stumbled across this beauty:

*enter heavenly music here*  I HAD to build it. SO i bought wood, borrowed some tools that day and started to build:

And then, voila!

I was super impressed: not only did it look great, it was SUPER sturdy too! So fabric was purchased:

Purchased outdoor fabric for cheap over at Fabric.com.  I then decided to tackle my first sewing project (with the help of Ana again with these outdoor cushion plans, and my mommy, of course!)

Then after about 57 mishaps with staining, sewing and other small disasters, i introduce to you… my first furniture build!:

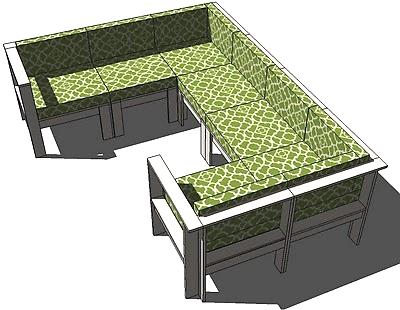
So then, of course, Ana decides to post an entire outdoor sectional:

GOSH ANA! SERIOUSLY?! But the great thing about this plan, you can build it piece by piece. One end piece here, one center piece there… and you end up with this:

Isn’t she pretty?! I never got a chance to finish the back cushions… and the sad part of the story? Half of her is at my boyfriend’s apartment and the other half is IN THE GARAGE FOR STORAGE! Sad sad sad story…. but this project started my crazy furniture desires to become a reality. This week i refinished an office chair and will finish building my new office desk this week! The key to start building something… just go buy the wood. If you force yourself to do that, you’re just going to have to try! You might suprise yourself….

*All graphics by Ana White

-Rachel

Furniture Stripping!

Thats right, i spent my sunday strippin my Stereo Cabinet. Track my progress so far and what i have left to do here.

Here she is in her craigslist add… doesnt look too bad from far away, but up close she was a wreck. Read about tearing out her insides here. It’s pretty amazing how much of a difference a little stripper and sanding will do to bring a piece back to life! Meet the helpers:

Sidenote: No, that is not sorbet. That orangyish goop is the Strypeeze (not striptease like i thought it said) Other side note: Don’t you love my cute new chucks?!

Ok, before we move on… beware! if you have an unusually pansy-ish stomach, you may not want to read on. Stripping was actually pretty yucky. The varnish came up in a bunch of gunk. Anyway, step one: just start paintin!

I threw on two fairly thick layers because it was unusually tough varnish. I actually attempted to use the refinisher first and epic fail. But lo and behold, the varnish had nothin on this orange goop. 15 minutes later and you’ve got this:

Those beautiful little bubbles and wrinkles are from the varnish getting whooped by the sorbet stripper. booya. Next step, get your scrapper and just go crazy. It should come off pretty easily, if not, either wait an extra 10 minutes or go back over the splotchy areas a second time. Usually if it doesnt come up right away, it’s just because you were too excited to wait the entire 15 minutes (might have happened to me a few times!)

Oh i know, that stuff looks like Dino snot. Still, very exciting how effective this stuff is. Here is the lid to show you a good before and after:

Now I know what you’re thinking… “wow, the before looks so much better!” Well of course it does! We are stripping, not finishing! This is a bit of a process but keep in mind, you are stripping down to the bare wood to then refinish and restain to make her look brand stinkin new. Just wait till this next part… After i stripped all the wood, i went back over it with the furniture finisher and steel wool. It helped take more of the stain off as well.

That part was pretty rough because i was really scrubbin the crud out of it. My sweet boyfriend even helped:

And check out the oh so pretty results:

Who knew there was actually wood under all that crap?!  i went on to sand it to get out some of the deeper scratches. I sanded pretty lightly since it was veneer but enough to smooth it out more. Most likely there will still be some scratches (she was pretty beat up!) But really that just adds a little vintage character, but i also plan on a slightly darker stain which will make the scratches less noticeable. Don’t forget to always, always, always, always, ALWAYS sand with the grain! No circles, no angles… just straight with the grain. Just trust me on this one. Well there ya have it!

Next week: rebuilding the inside and front panels! Super excited and I plan on doing it all for free with scraps! What what!

Girl, put your record on…

As you probably already know from this post I’ve been looking for a record player console table for the last few months and guess what! Found it!

So yesterday i thought it would be a good idea to kidnap my very sick older brother and make him go on a craigslist run with me! Somehow we fit a 60″ long console table into my 2 door Scion TC… pretty sure it was illegal and very dangerous. I had to move the passenger chair all the way up and had my brother (attempt) to drive my manual car while sick. My head was touching the glass of the windshield and the airbag was only a few inches from my face. Of course Justin decided to still drive like a maniac even though a crash would undoubtably result in my untimely death. BUT all of this for a good cause… an amazing fixer upper for only 40 bucks! Here are the pictures from the Craigslist ad (since it was 8pm and dark when we decided to pick it up!)

Don’t let your eyes deceive you, my friends. She’s quite a beaute but she’s also a hot mess! Not only did the speakers FALL OUT while we moved it, im pretty sure none of the equipment is in working condition and I’m not sure if it will ever be. On top of that, it desperately needs to be refinished as well as certain wood pieces replaced. AND my favorite part of the piece, the front wood paneling…. plastic! Yuck! How can i restain it all a different color if that is plastic?! I haven’t completely decided the details but here is the plan of action:

*UPDATE* I’m going to be marking off the steps as i go!

Step 1: Wood

– Strip entire piece (remove varnish)

-sand entire piece

Step 2: Cosmetic

– replace front panels with REAL wood

– build wooden speaker covers like the second image on this post

– (*NEW) Build storage for my records

-(*NEW) Build for new record player – add stability and cut to fit

– Stain – dark walnut?

Step 3: Electronic

-Buy new speakers

-Get a new receiver

-new record player Found a really great one at a Goodwill auction for 20 bucks!

-set up ipod hook up

Step 4: Enjoy!

-Listen to Frankie or Billie on vinyl while eating at the dinner table

-Jam out to Girl Talk on my ipod before going out with the ladies

-Eventually buy a flatscreen panel tv and set everything up through this baby!

Man this is going to be long project!

Ok, ok, i admit it…

You know how this weekend i snagged some records for only 5 bucks? Funny thing is… i don’t have a record player yet. But for the record (haha, get it?) I’ve been on the lookout for a record player for the last few months. What I’m looking for is something like this:

Rad, huh?! I would love to find an old, ugly broken one and fix ‘er up… what i would REALLY love is a console like this:

Maybe throw in some brand new speakers… an ipod hook up and then youve got a beautiful multi use console table! And then i can play my fancy new Frank & Ella records 🙂 Now just waiting for a good priced one on craigslist! (*fingers crossed*)

Dining room table update!

Well guys, i decided against building my own table and chairs… as cool as that would be to say “hey, i built that!” there are SO many choices on Craigslist popping up daily for less that what it would cost for me to build. So instead… i plan on finding a piece of junk and refurbishing it! Theres nothing like breathing some life into old furniture. PLUS, its recycling! Hooray! I’ve also decided now on with whatever i build to not buy new wood. Instead i will do what i can to find used. You can use palates, find old barn wood, fences or even deconstruct old furniture. It might take longer to find the wood but if that means one less tree gets chopped down, its worth it, right?! Just make sure that the wood is not rotting or termite infested… that would be pretty awful to build an awesome chair and then have it break in half with your grandma in it sending termites running all over the dining room! (ok, a little overdramatic but hey! i could happen) Here are are some examples of furniture build from reclaimed wood. The last dining table is actually build out of old railroad wood! Talk about a conversation starter….

Older woods are great for that rustic look but also work out for modern or shabby chic… All depends on how you treat it. Till next time!

-Rachel

Forget politics, vote for this!

My next build project (first one is here) is a dining room table and chairs! This is the table I’ve decided to build. It seats 6 but for a 30$ part i can make it… EXTENDABLE to fit 8! Cool, huh? Also, while those 2 extra chairs aren’t in use, i can have them at my work desk and art table (which currently dont have chairs) So i figure… if i’m going to put in the effort of building a dining table from scratch, might as well shove as many friends/family around it as possible. I like really simple and i love dark wood so this table is really what i’m aiming for!

Initially, I was just going to build the table and just buy chairs, but good ol’ Ana recently posted some “easy” DIY chairs… the thing is, i like them both! What are your thoughts?

Option A: Square Chair

Option B: Upholstered Parson Chair

There are multiple pros and cons with each chair. Lets start with cons because, well… i like to mix things up.

CONS:

  • Opt A: intricate woodwork will be tricky to get even and also make the chair less sturdy (the more you chop up wood like that, the weaker it will be)
  • Opt B: Well just look at that sucker! It would probably take me a month just to get through one chair! And if i extend the table that means 8 months just for all the chairs!! Also, I am not a seamstress.  Oh, i know what you’re thinking – my cushions were AMAZING for my lounge chair… but that was just a sewn square – this is an entire chair. Its also more expensive with the cushions, batting, more wood, etc.

PROS:

  • Opt A: Love this chair ever since i saw it on West Elm. Just a fun, unique design that adds character to a room. Most of the chair is super easy to build and wouldn’t take more than a day or two.
  • Opt B: Have also always loved the Parson Chairs and never once thought I could build one from scratch by myself. Until now. MUCH more comfortable than bare wood. One of my favorite parts is i would be able to pick my own fabric! I love funky fabric so that would bring a completely new element to my dining room!


So there you have it! Opt A: the Squared chair; Opt B: Parson Chair, Opt C: No chairs and make my guests sit on the floor.  What do you guys think?!


-Rach


Ana-White.com

This is a shout out to my girl, Ana! If you know me at all or have ever read my blog, you’ve seen furniture I’ve built from scratch. I am not a woodworker and have ZERO experience, but the one thing I did have was this website., Ana-White.com Everything you could ever need to know to build modern, sturdy, beautiful furniture. The first thing I built was The Outdoor Lounge Chair and very quickly moved on to my entire porch and build an outdoor sectional! I’m still in the process of making cushions but it is beautiful, comfortable and incredibly sturdy. Keep checkin back for updates on my current building projects and some fun how tos!


Ana-White.com.